


The explanation of the Mi Band 4 seems to be that it won't work unless everyone is using a hacked Mi Fit, which won't be updated, just updated by the maker. At the moment it can't even be put on the bracelet, even if it was ready. But that little English menu is understood by many, as it doesn't require too much even at a basic level. On the other hand, the main page with the clock, date, day, etc. can be customised to your liking! Let's get started!
What we need
- Internet
- PC
- Mi Band 4 Bracelet
- Android smartphone
- Ész
The easiest way is to download a ready-made sheet of paper and examine it when it is disassembled. To do this, download the following:
Save the PC program to a folder, preferably in the root, such as C:\\MB4WF and unpack it. We get two folders "PaletteImageMode" and "RawImageMode". The first one is for images with a reduced color palette, less color, less size, while the other one is for graphic elements with 16 and 32 bit color depth. Use the latter, it will be beautiful!
Copy the downloaded ".bin" file into the "RawImageMode" folder and open a command line here (I won't go into that, we already know that much). Enter the following command line:
WatchFace.exe green_neon.bin
The program then unpacks the files in the spreadsheet into the same folder as the file name. Let's see what a watch face is made of. Mostly images and a ".json" text file describing the position and function of the images.
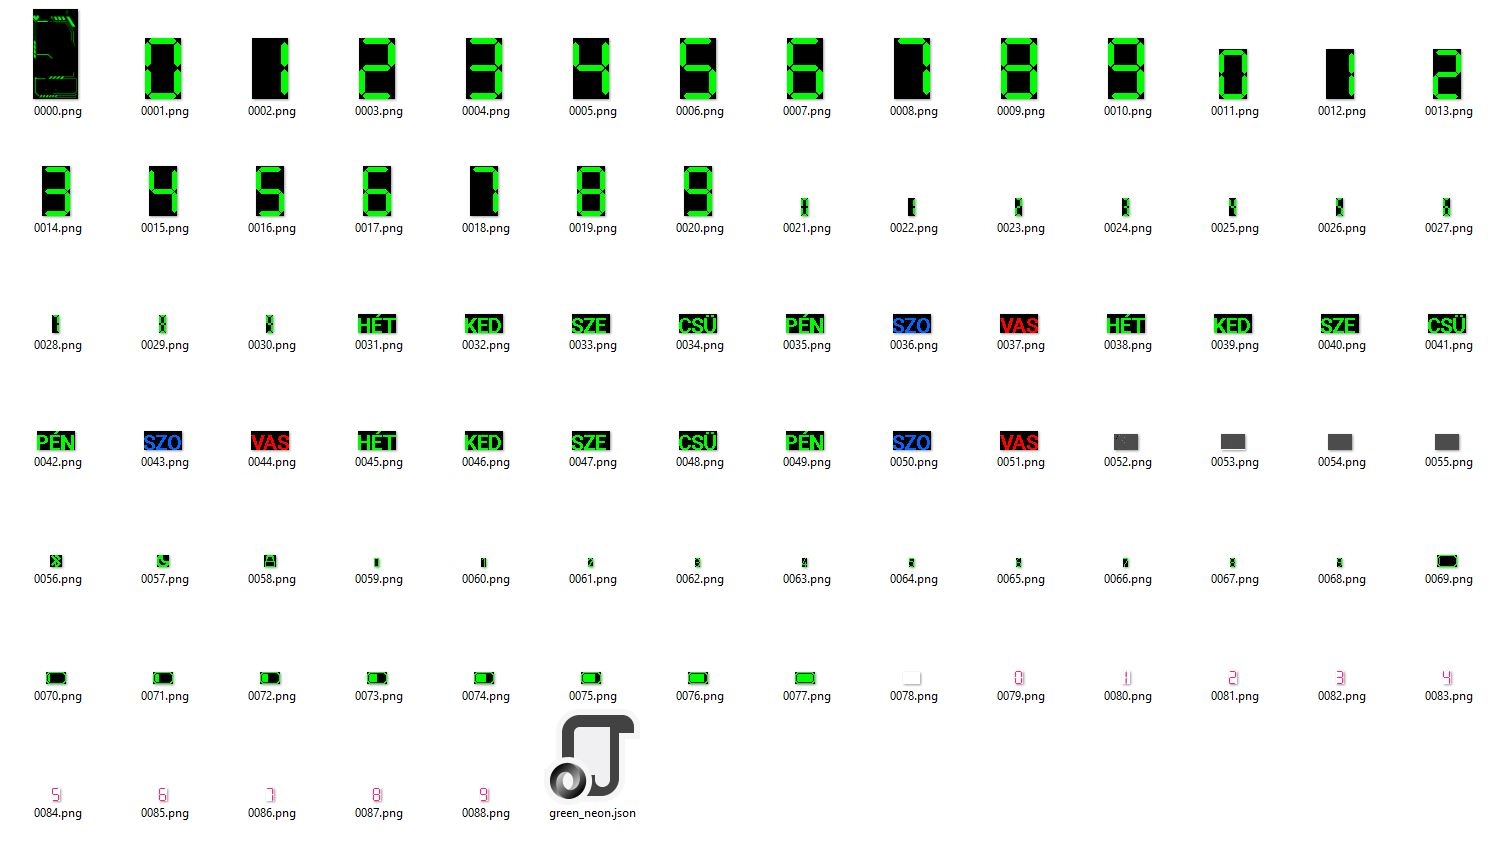
This is the Green Neon dial, one of the ones I have translated. Let's stick with this one, as it has almost all the elements that can be displayed, except the weather, which is not yet resolved. The ".json" file tells you exactly which image has which coordinate and function. Open it with e.g. Notepad++, or your favourite word processor, EXCEPT Office Editor or Wordpad, so that the structure doesn't change, or it won't work!
Code A
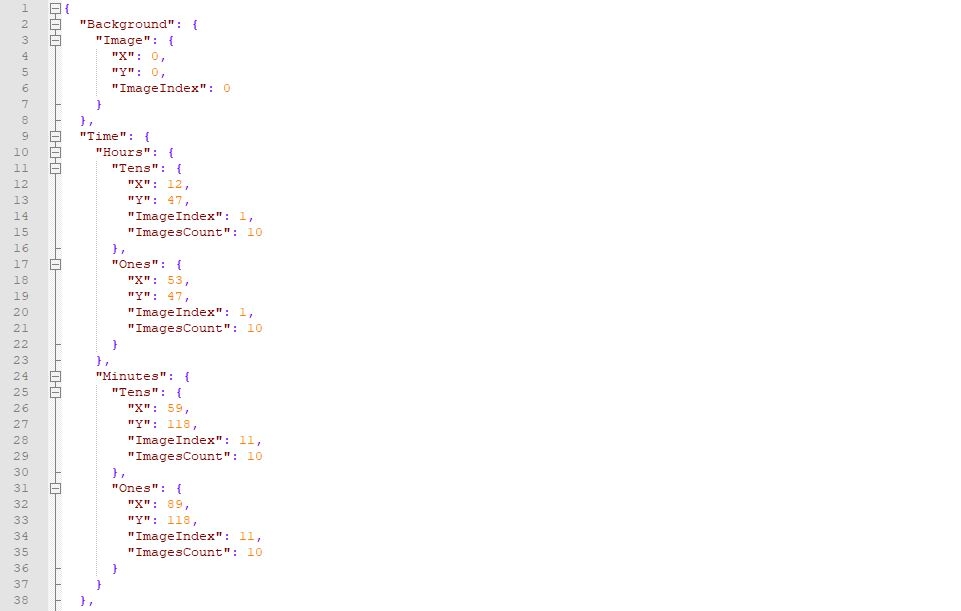
The structure of the ".json" file is infinitely simple, so it will be natural for someone who knows a bit about programming languages, but it is not too complicated for a layman either, since everything is organized in "{}" characters. Let's look at the beginning of the file, which consists of the background of our number page and the time.
"Background": {
"Image": {
"X": 0,
"Y": 0,
"ImageIndex": 0
}
},
Using a little English, "Background" means background in English, and then specifies that it is an "Image". Then we specify the starting coordinate of the image on the X and Y axis. Finally, the numbers in the filename define the image file (ImageIndex). So X: 0 and Y: 0 which means to position the image 0 pixels from the top left corner, on both axes. The exact size of the background image and screen in pixels is 120 x 240, so we can work from that.
In the same way you define the location and function of each graphic element, let's look at the definition of the clock numbers:
"Time": {
"Hours": {
"Tens": {
"X": 12,
"Y": 47,
"ImageIndex": 1,
"ImagesCount": 10
},
"Ones": {
"X": 53,
"Y": 47,
"ImageIndex": 1,
"ImagesCount": 10
}
},
"Minutes": {
"Tens": {
"X": 59,
"Y": 118,
"ImageIndex": 11,
"ImagesCount": 10
},
"Ones": {
"X": 89,
"Y": 118,
"ImageIndex": 11,
"ImagesCount": 10
}
}
},
In the "Time" section, the number of characters (Tens, Ones) for the "Hours" and "Minutes" must be defined separately, from to. The coordinates of the X and Y axis are discussed above, and the first character of the "ImageIndex" is 0 (zero), followed by the other numbers up to 9. So the first character of the clock is the image 0001.png, which is zero and then "ImagesCount" determines how many images are the last, so 0010.png. In the same way each number character is determined.
"Activity": {
"Steps": {
"Step": {
"TopLeftX": 5,
"TopLeftY": 145,
"BottomRightX": 53,
"BottomRightY": 163,
"Alignment": "TopCenter",
"Spacing": 1,
"ImageIndex": 21,
"ImagesCount": 10
}
},
"Pulse": {
"Pulse": {
"TopLeftX": 20,
"TopLeftY": 18,
"BottomRightX": 38,
"BottomRightY": 33,
"Alignment": "TopLeft",
"Spacing": 1,
"ImageIndex": 79,
"ImagesCount": 10
},
"DelimiterImageIndex": 78
}
},
The placement of the additional elements is a bit more complicated, you can specify the horizontal position of the image element (Aligment), which corner pixel to start from (TopLeftX and TopLeftY), if there are multiple elements, the placement of the others relative to the first (BottomRightX and BottmoRightY), the amount of space between elements (Spacing), and the name of the image separator between the elements (DelimeterImageIndex).
"Date": {
"MonthAndDay": {
"Separate": {
"Month": {
"TopLeftX": 16,
"TopLeftY": 199,
"BottomRightX": 58,
"BottomRightY": 217,
"Alignment": "TopLeft",
"Spacing": 1,
"ImageIndex": 21,
"ImagesCount": 10
},
"Day": {
"TopLeftX": 43,
"TopLeftY": 199,
"BottomRightX": 27,
"BottomRightY": 216,
"Alignment": "TopLeft",
"Spacing": 1,
"ImageIndex": 21,
"ImagesCount": 10
}
},
"TwoDigitsMonth": true,
"TwoDigitsDay": true
},
"WeekDay": {
"X": 72,
"Y": 197,
"ImageIndex": 31,
"ImagesCount": 21
},
"DayAmPm": {
"TopLeftX": 90,
"TopLeftY": 97,
"ImageIndexAMCN": 52,
"ImageIndexPMCN": 53,
"ImageIndexAMEN": 54,
"ImageIndexPMEN": 55
}
},
Setting the date is the same as placing the images, but here you get some extra information. "Date" is the date, "MonthAndDay" is the month and day elements, and "Separate" specifies that the two should be separate, not together. After specifying the location of the month "Month", the location of the day "Day" follows, and then you have to specify how many characters it should be (TwoDigitsMonth and TwoDigitsDay), in this case the "true" option sets it to true, so it will be two digits. "WeekDay" prints the name of the day, which is between 0031 - 0052.png, which is in 3 languages, please translate all of these into Hungarian, because it might not be Hungarian for some other phone languages! The "DayAmPm" is completely unnecessary for us, because we have a 24 hour dial.
"StepsProgress": {
"Circle": {
"CenterX": 28,
"CenterY": 155,
"RadiusX": 27,
"RadiusY": 27,
"StartAngle": 0,
"EndAngle": 360,
"Width": 6,
"Color": "0xF12389"
}
},
This is one of the oddities, which is not made up of pictures, but drawn by the bracelet. This is the daily set value of the step, which in this case is a circle. "CenterX" and "CenterY" define the center of the circle, "RadiusX" and "RadiusY" define the size of the circle, "StartAngle" defines the start point, "EndAngle" defines the end point in degrees, "Width" defines the thickness of the circle and "Color" defines the color in hexadecimal (0x......). This can be illustrated with pictures, you can take one of those number sheets and see the solution.
"Status": {
"DoNotDisturb": {
"Coordinates": {
"X": 5,
"Y": 3,
"X2": 17,
"Y2": 2,
"X3": 1
},
"ImageIndexOn": 57
},
"Lock": {
"Coordinates": {
"X": 22,
"Y": 3,
"X2": 17,
"Y2": 2,
"X3": 1
},
"ImageIndexOn": 58
},
"Bluetooth": {
"Coordinates": {
"X": 39,
"Y": 3,
"X2": 12,
"Y2": 2,
"X3": 1
},
"ImageIndexOff": 56
},
"Battery": {
"Text": {
"TopLeftX": 0,
"TopLeftY": 0,
"BottomRightX": 0,
"BottomRightY": 0,
"Alignment": 0,
"Spacing": 0,
"ImageIndex": 0,
"ImagesCount": 0
},
"Text2": {
"TopLeftX": 67,
"TopLeftY": 4,
"BottomRightX": 87,
"BottomRightY": 14,
"Alignment": "TopRight",
"Spacing": 1,
"ImageIndex": 59,
"ImagesCount": 10
},
"icon": {
"X": 95,
"Y": 3,
"ImageIndex": 69,
"ImagesCount": 9
}
}
}
Finally, define the icons at the top of the screen with DND, BT, Lock and Battery icons and percentages.
"Other": {
"Animation": {
"AnimationImage": {
"X": 0,
"Y": 103,
"ImageIndex": 78,
"ImageCount": 13,
"X3": 100
},
"x1": 0,
"y1": 1000,
"Interval": 200
}
}
An extra for your account page, you can animate an image, you have to put the elements of it, not a .gif animated image. You can also disassemble a .gif image with a suitable program and place it on the bracelet, when the screen comes up, it will move. The start is known, though you put this at the end of the .json file, enter the start coordinate of the top left pixel, then the name of the first image and how many frames the animation consists of, "X3" specifies how many times it should repeat. Then the start and end of the animation, and the interval between frames (Interval).
Note that you can place quite a few graphic elements on the background, and just put the numbers in place. The images should preferably be enhanced or redrawn using PhotoShop or a graphics program of similar quality and saved in PNG-8 256 colours. It can be transparent, that's no problem either.
When you're done and want to try it out, issue the following command on the same command line:
WatchFace.exe green_neon/green_neon.json
Final steps
This will repackage our spreadsheet in the green_neon_packed.bin folder and create two previews, one as .png and one as a moving .gif. This gives you a quick look at what you have created, but you can also try it out in real life, for me the easiest way is to use Mi Bandage with Hungarian app go. If the program runs into errors when repackaging, it creates a .log file with the name of the counter page to tell you why it failed. Maybe an image is not supported, maybe the .json file is corrupted, you'll find out.
Ask your questions in the forum hereso that everyone can find the information they need in one place.


